Key Takeaways:
- If your car vibrates specifically when decelerating, the most common culprit is Disc Brake Lateral Runout or “warped rotors”.
- Shaking is often caused by Cementite formation, a hard carbon compound created when brake pads overheat on the rotor surface.
- DIY Diagnosis can be performed via a “Slow Roll” test or by measuring runout with a dial indicator.
- For safety and performance, modern lightweight rotors should usually be replaced rather than “turned” or resurfaced.
Introduction: The “Death Wobble” of Deceleration
Few things are more unnerving than a steering wheel that begins to dance in your hands the moment you apply the brakes. This sensation, often described as a rhythmic vibration, shudder, or oscillation, typically stays hidden at highway speeds until you begin to slow down for an exit ramp or a stoplight.
When a car shakes or vibrates while driving, it can be alignment or balancing; however, if the car shakes when braking, you are likely dealing with a mechanical failure in the friction surface of your braking system. As a Master Brake Technician, I’ve found that ignoring this “brake judder” doesn’t just ruin your comfort—it actively degrades your vehicle’s safety systems and increases emergency stopping distances.
What Causes a Car Shakes When Braking?
To understand why the car shakes, we have to look at the physics of stopping a two-ton vehicle. Your brakes convert kinetic energy into heat through friction. When that process is interrupted by an uneven surface, the result is a vibration sent through the chassis.
Understanding Disc Brake Lateral Runout
Lateral runout refers to the side-to-side “wobble” of the brake rotor as it spins on the wheel hub. Even if a rotor is perfectly flat, if it is not sitting perfectly true on the hub, it will “kick” the brake pads back into the calipers with every rotation. This hydraulic kickback is what you feel in your foot and hands.
The Role of Excessive Heat and “Warping”
While we use the term “warped,” iron rotors rarely bend like a vinyl record. Instead, “warping” is usually Disc Thickness Variation (DTV). Under extreme heat—such as riding the brakes down a steep hill—the rotor metal can expand unevenly. If the pads remain in contact with a hot, stationary rotor, they can transfer friction material unevenly, creating “high spots” that are only a few thousandths of an inch thick but enough to cause a violent shake.
Cementite Formation: The Hidden Enemy of Smooth Braking
When rotors are subjected to temperatures exceeding 1,200°F, the iron structure itself begins to change. Friction material from the pads can fuse with the iron to form Cementite, an incredibly hard and brittle carbon compound. Because Cementite does not wear down at the same rate as the surrounding iron, it creates permanent “hills” on the rotor surface that cannot be easily fixed, leading to persistent vibration.
5 Symptoms of Warped Rotors You Shouldn’t Ignore
Recognizing these symptoms early can save you from a complete loss of power while driving or total brake failure.
1. Pulsating Brake Pedal Sensation
This is the most common red flag. As the high spots on the rotor pass through the brake pads, they push the fluid back up the lines, causing the pedal to pulse or “kick” against your foot.
2. Steering Wheel Oscillation during Deceleration
If you feel the shake primarily in the steering wheel, the issue is almost certainly with your front rotors. The front brakes handle roughly 70% of the stopping force; any imperfection there is amplified through the steering rack.
3. High-Pitched Squealing or “Scraping” Noises
Warped rotors often cause the pads to make intermittent contact even when you aren’t braking. This can produce a rhythmic “chirp” or “scrape” that matches the speed of the wheels.
4. Visible “Heat Spots” or Blue Discoloration on the Disc
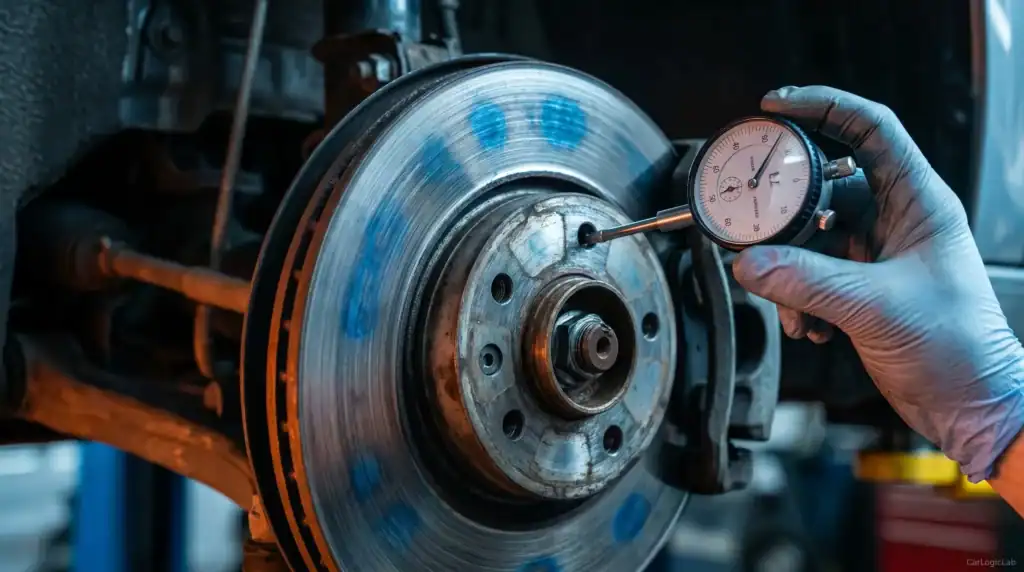
If you look through the spokes of your wheels, a healthy rotor should be a uniform dull silver. Blue tints or dark, “leopard-spot” patches indicate areas where the rotor has overheated and potentially formed Cementite.
5. Increased Stopping Distances and Poor Brake Bite
When a rotor is uneven, the brake pads cannot make 100% flush contact with the surface. This reduces the friction coefficient, meaning you have to press harder and wait longer to come to a full stop.
DIY Diagnosis: How to Test for Warped Rotors at Home
Before heading to the shop, use these pro-level diagnostic tricks to confirm the rotors are the culprit.
The “Slow Roll” Braking Test
Find an empty, flat parking lot. Accelerate to about 10 mph and apply the brakes very lightly and steadily.
- The Clue: If the car stops with a rhythmic “grabbing” sensation—where it feels like it slows down more, then less, then more—you have found a high spot on your rotors.
Using a Dial Indicator to Measure Runout (The Pro Way)
If you want to be 100% certain, you need a Magnetic Base Dial Indicator.
- Jack up the car and remove the wheel.
- Mount the indicator to the suspension strut and place the tip against the rotor face.
- Rotate the rotor by hand.
- The Standard: Most manufacturers allow for a maximum of .002 to .005 inches of runout. Anything higher requires immediate attention.
Can You Fix Warped Rotors or Should You Replace Them?
The “repair vs. replace” debate is a common one in the vehicle maintenance community.
When “Turning” (Resurfacing) Rotors is a Viable Option
“Turning” involves putting the rotor on a lathe to shave off a layer of metal, creating a fresh, flat surface. This is only viable if the rotor is still above the “Discard Thickness” stamped on the hub. However, if Cementite has formed, the lathe bit will often skip over the hard spots, and the vibration will return within 2,000 miles.
Why Modern Rotors Often Require Full Replacement
To improve MPG, modern automakers use thinner, lighter rotors that have very little “extra” metal to spare for resurfacing. Additionally, the labor cost of resurfacing ($60–$100) is now often higher than the cost of a brand-new, high-quality replacement rotor.
Recommended Brake Replacement Tools & Parts
If your diagnosis confirms warped rotors, we recommend upgrading to components that handle heat better than factory “OEM” parts.
- The Precision Tool: Check on Amazon Fowler Magnetic Base & Dial Indicator. Essential for ensuring your new rotors are installed with zero runout.
- Cleaning Prep: Check on Amazon CRC Brakleen. You must remove the protective shipping oil from new rotors before installation.
Conclusion: Safety Risks and the “Bedding-In” Procedure
Ignoring a car shaking while driving due to rotors can eventually damage your wheel bearings and suspension bushings. Once you install new rotors and pads, the most critical step is the “Bedding-In” procedure. This involves a series of controlled stops from 40 mph to 10 mph without coming to a full halt. This “seasons” the rotors and transfers an even layer of pad material to the disc, ensuring your car stays shake-free for years to come.